Sunday, December 19, 2021

Misc parts, priming & painting

 Previously, I had mentioned that we had some difficulty with some sort of contamination that was causing fish-eye (small crater) blemishes in the primer.  This happened while priming the aluminum front kick-panels, the baggage door, and the lower rear cover plate.  We took several additional steps to ensure everything was super clean, and that the paint and air were well filtered before spraying.  However, the problem did not go away.  We now suspect that the problem is with the metal primer itself, especially since we didn't have any of these issues when shooting the fabric primer, or the topcoats.

Small crater blemishes in the primer (streaks are just water marks after wiping the part)

After a few coats of primer and too much additional sanding, we now have parts that are ready for paint, but this was a frustrating experience.  I think we'll change to a different metal primer for remaining metal parts that are not yet primed (such as the turtledeck).

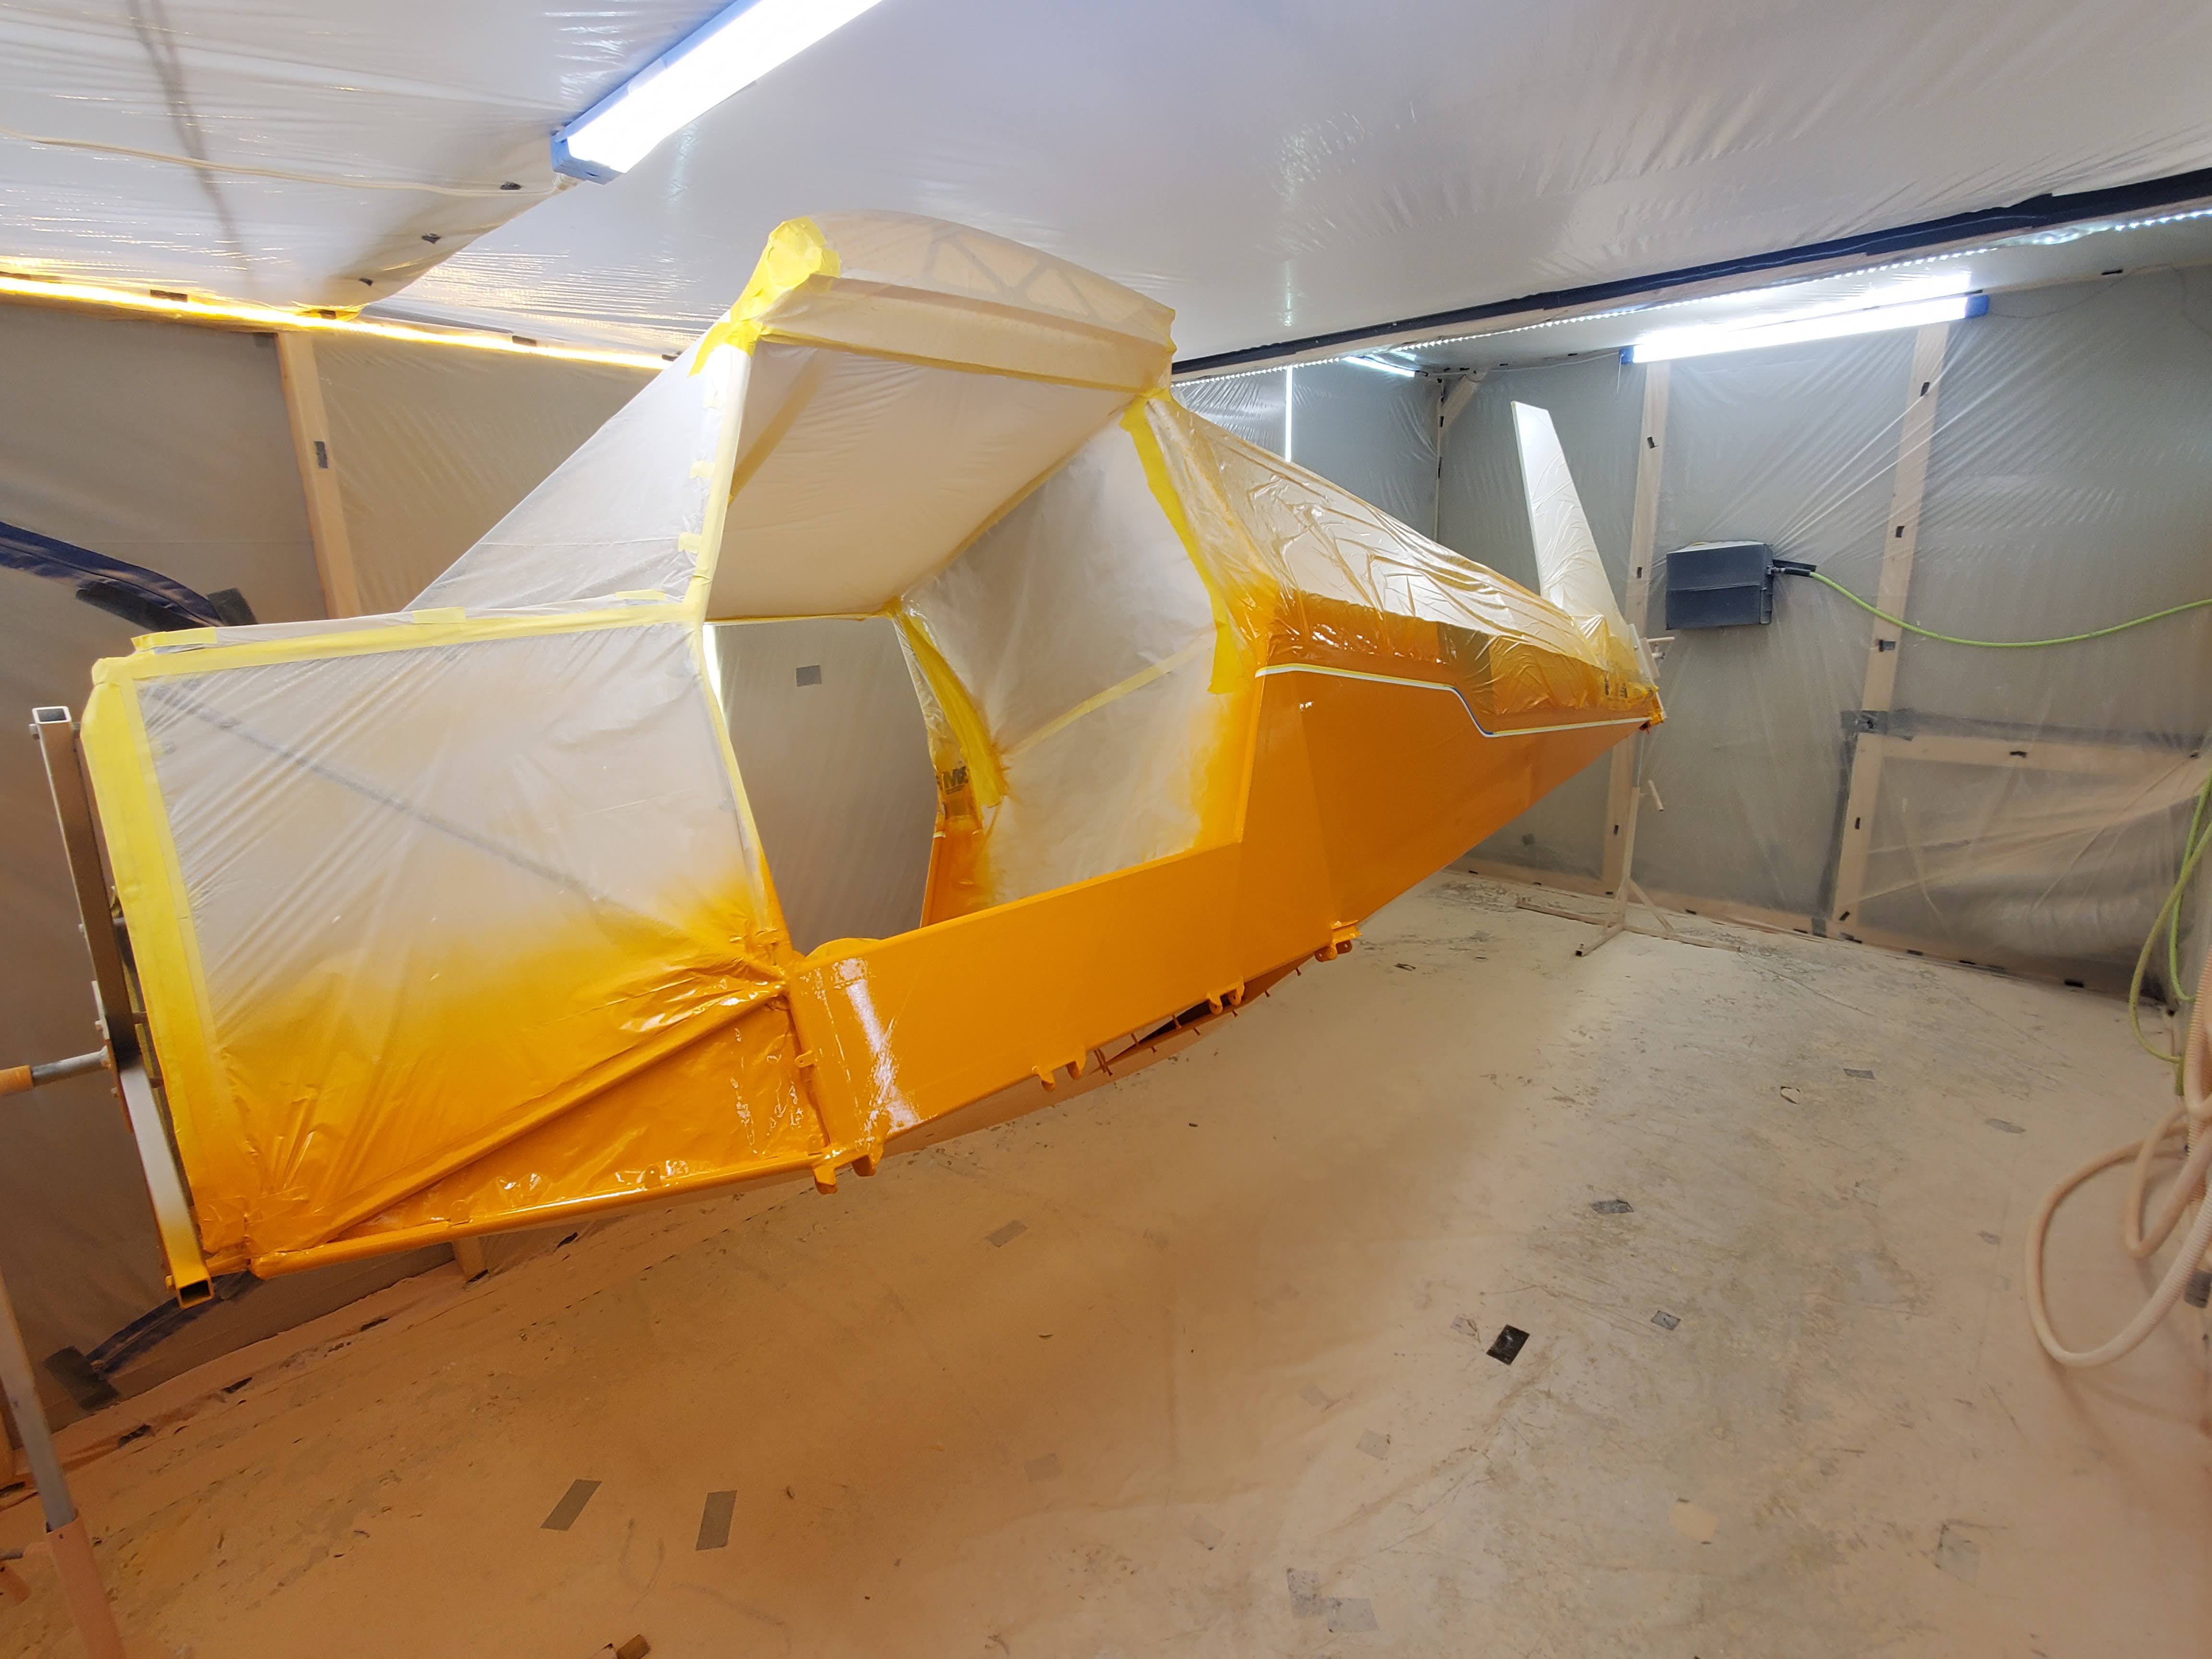
We then decided to paint the front gear leg, front fork, and rear aluminum cover plate, as these parts will be all orange.  The parts were prepped, cleaned, and hung.  We sprayed a coat of orange... and as expected, we did not have contamination issues like we experienced with the metal primer.  We then sanded/scuffed the parts to prepare them for a second coat.  Hours: 12

First coat of orange on some additional parts

Saturday, December 11, 2021

Paint room and priming updates

 We finished downsizing the paintbooth, which also required modifying the front door panels to fit the new shape, adding some gasketing, and making sure everything was sealing correctly.   With a smaller room, we can now keep the fuselage outside of the paint booth.

Paint booth for smaller parts

We also have a temporary air outlet that we can setup before painting to exhaust the paint fumes out of the garage, and then disassemble after painting so that we can fit the fuselage back in the garage.  This was constructed with two U-shaped pieces constructed with 2x4's on each end, along with two 10 ft 2x4's clamped to these pieces, and a single sheet of plastic clamped to the 2x4s.  We can set this up in about 5 minutes and raise the garage door about 2 feet to allow the fumes to exhaust out the garage.  Seems to work great.
Paint room with lower exhaust outlet

We then prepped some smaller aluminum parts for paint.  The baggage door has some pulled rivets, and we filled the holes with 3M filler and sanded them so that we would have a smoother surface.  This door door, along with a few other parts (rear cover plate and side kick panels) were scuffed, cleaned, and hung in preparation for priming with an epoxy primer

Michael sanding rivet heads on baggage door

We applied a coat of primer, but ran into an issue with some sort of contamination that caused fish-eye type craters in the primer coat.  We allowed it to dry, sanded the coat of prime down to eliminate the fish-eyes, then adjusted some of our procedures to ensure we cleaned everything better and put new filters inline with our paint gun.  We remixed some primer and tried respraying two days later day.  Unfortunately, the contamination problem still exists so we haven't solved the problem.  This is frustrating because we are using the same products and procedures that we have used in the past, yet we are getting these fish-eye blemishes.  We will now go back to painting some practice parts until we get the issue corrected.   Hours: 16


Friday, December 3, 2021

Painted the Main Lift Struts and More

The last large (i.e. long) part that needed to be painted were the two main lift struts.  They came from Just Aircraft with gray powder coat applied but we decided that they would look much better painted the same Vestal White as was applied to the fuselage.  We had to scuff the powder coat and clean the parts before painting.  We also painted the small Jury Struts at the same time.

Lift Strut Painted Vestal White

To paint the Struts we moved the fuselage outside for it's debut in the sun!  We had to take a photo with the two builders (i.e. US!) for our family and friends!

First time Painted Fuselage has been outside

With the last long part painted and allowed to cure we no longer needed the large paint boot taking up a large portion of the garage.  Over the Thanksgiving week, the front part of the paint booth was removed.  The side entry door was re-framed and installed. The two front doors still need to be extended in height in order to allow them to seal up the room.

Re-Sizing Paint Booth

We started working on the firewall next.  Just Aircraft had provided us with stainless steel material for the firewall.  To save some weight (about 2.5lbs) we chose to use titanium as our firewall material.  That material was sourced from McMaster Carr.  First the width was trimmed using hand shears.  We then had to cut notches around the nosewheel mounting points on the fuselage.  The nibbler tool worked perfectly for this task. Once we had the bottom edge of the firewall where we wanted it to be we marked the side areas that needed some clearance notches.  The process was identical to the original notches and quite a bit quicker since they didn't need to be as deep.

Ed using Nibbler tool on Firewall

Finally, once the firewall had a good fit we drilled the 8 attach point holes and cleco'd the firewall in place.  We also drilled the four corner engine mount holes.  We still have some work to do on those holes before we can put the engine mount on the fuselage.  The top of the firewall still needs to be trimmed to match the boot cowl, but that too is for another time.

Firewall Drilled and Cleco'd in place

Hours: 15

Tuesday, November 16, 2021

 Several small updates since last post:

We removed all the masking from the interior that was painted gray, and are pleased with how the gray color we used matches with the existing gray powerdercoat on the airframe.  

Gray interior, masking removed

 We also worked on the turtledeck area, adding a strengthening plate that fits under the antenna.  We are using flush mounted solid rivets here to make it look nice, and practiced riveting  on some scrap aluminum before working on the turtledeck.  The practice rivets came out great; however, when we attempted to the first few rivets on the turtledeck, things didn't work out so nicely.  We attempted to drive 2 rivets, and noticed a few small dents from the rivet gun, and also one of the rivets was not flush.   We immediately stopped and considered what went wrong and how to recover.  We noticed the rivets were not tight in the holes, and this appeared to have been caused by the holes expanding slightly during the dimpling process.  Also, the dents were likely caused by not holding the rivet gun precisely perpendicular to the piece.  We drilled out the rivets, and ordered slightly larger rivets so that they would fit better.  We also tapped out the slight dents with a metal working hammer and dolly.

Once the new rivets arrived, we re-dimpled the holes for the larger rivets.  The existing holes were slightly undersized at this point, so we drilled them to the final correct size so the rivets would fit perfectly.  This second time around, the riveting went great and all the rivets came out looking nice (and no dents).

Ed doing a little riveting

Underside of strengthening plate (riveted to turtledeck)


We received the new rear windshield bracket (the original one was incorrectly drilled as mentioned in an earlier post), trimmed it for fit, clamped it in place carefully, drilled it, and cleco'd it in place.
Rear windshield bracket drilled and cleco'd in place

Lastly, we installed plastic fairleads for control cables and the pushrod.  The pushrod fairleads have nice rings that could be set into place with a tool.  But the fairleads for the control cables just have miserable ring clips that are very stiff and difficult to snap into place.   Hours: 15
            
Cable fairlead with clip snapped into place

Sunday, November 7, 2021

Interior Paint, Turtledeck work

We are planning to install our Com antenna on the turtledeck, and since the aluminum is fairly thin in this area so we decided to bolster it with a doubling plate in order to strengthen the area.  We made this 10"x10" plate from 0.25 sheet aluminum, bending all the edges down with a brake to strengthen it further.  We drilled holes and dimpled the material in both the turtledeck and the strengthening plate, and will rivet them together in the near future.
Doubler for Com antenna

We decided to paint (prime) the interior of the plane gray in order to make it look a little nicer, and to match the gray color of the existing power-coated tubing.  In order to match the grays, we decided to create our own shade of gray by adding pigment (Mixol dye #1) to Superflite white primer.  We experimented in order to get the grays to match, and ended up using 100 drops (about 5ml) of black pigment for every 6 ounces of primer.   We did a lot of masking to try and keep things neat, and didn't paint the sections that will be covered with aluminum floorboards.  We applied the colored primer with regular paint brushes.  It took 2 coats to even everything out, but we're happy with the results. Hours: 14

Gray interior

Monday, October 25, 2021

Landing gear, wheels, rear opening, turtledeck

 The correct bolts for our landing gear arrived, so we were finally able to attach the gear to the fuselage. The gear managed to get a couple of paint scuffs during the process of threading it through the opening we made, but these were minor and can be touched up easily enough.

Next we proceeded to install the axles, brakes (by Matco), and wheels.  The wheel bearings had to be greased prior to installation, and we used a nifty plastic device that has a plunger to force grease into the bearings.  This worked well.  Once attached, we torqued all the bolts down to the proper value and applied torque seal.  The large castle nut on the wheel was installed with a cotter pin.

Pushing grease into the bearings

Main landing gear and wheels attached

We installed 3 rivnuts around the lower rear fuselage opening that will be used to attach the bottom rear coverplate.  
Installing rivnuts with a special puller tool

Next we planned on doing some work on the aluminum turtledeck prior to painting it, but first needed to temporarily attach the rear windshield bracket as the turtledeck rests on top of it.  We ran into a bit of a problem here because of a few issues.  We had previously placed and drilled this bracket, but when temporarily installed with Cleco's, it didn't line up correctly with the right and left root rib.  We're not sure what happened, and maybe it slipped when it was last drilled (many moons ago).  Also the bracket had a few odd bends to it so the back edge was not straight, and the bracket angle didn't line up with the root ribs, either.  We considered ways of recovering from this and rebending the bracket, but decided to just order a new bracket and redrill it.  The bracket was only $16 from Just, which made it an easy decision.   Hours: 9.5


Tuesday, October 19, 2021

Fuselage unwrapping, Side panels, Baggage door hinge

We finally removed all masking and protective wrap from the fuselage and got a good look at the two-tone paint job.   Looks great and we are very happy with the results.  We are planning on adding a 1" stripe between the white and orange, but that won't be applied until later.


We installed the landing gear brackets, and had planned on immediately installing the landing gear so that we could get the plane on wheels again, but ran into a minor issue.  The bolts we have on hand are slightly too short.  We ordered some longer bolts and will install it when they arrive.

In the meantime, we decided to install rivnuts (rivet nuts) for the front aluminum panels located on the front-sides of the fuselage.  We up-drilled holes in several (24) of the steel fuselage tabs to accept the rivnuts, deburred the holes, and then installed the rivnuts with a puller.  We also added a little epoxy when installing the rivnuts which was a recommendation we got from Kitplanes magazine.  This will make them much less likely to fail (break free and spin) in the future.  Hours: 5

RivNut installed in the metal tabs

Next, we riveted on the hinge for the baggage door that we had previously fabricated. 
Hours: 5.0

Hinge riveted to fuselage

Thursday, October 14, 2021

Landing Gear and Mounts are Orange

 We laid down a coat of orange on the Grove landing gear and the mounts for the gear.  We sanded them lightly the next day, and followed that up with another coat of orange.  Very happy with how they came out..they are looking pretty sharp with a couple coats of Ocala orange. Hours: 5

Gear and mounts painted


Monday, October 11, 2021

Epoxy Priming Main Landing Gear and Gear Mounts

We received our packet from Aircraft Spruce containing AlumiPrep and a new quart of Superflite Epoxy Primer and Catalyst.  Each of the parts were cleaned with AlumiPrep cleaner and then flooded with water to neutralize the cleaner.  The parts were wiped dry, all holes were dried with compressed air.  Our final step was to wipe the parts with Isopropyl Alcohol.  The all parts were painted with the Superflite Epoxy Primer and allowed to dry overnight.  We lightly sanded the parts with a Grey Scotchbrite pad and inspected the parts for coverage.  The main gear looked adequately covered, but the smaller parts had some areas that needed a second coat so we wiped them down again with Isopropyl Alcohol and sprayed another coat of Epoxy Primer.

After another day to dry, the parts were lightly sanded again with grey Scotchbrite and inspected.  The parts are now ready for their final top coat of Ocala Orange paint.

Hours: 4.5

Parts in their nice white Epoxy Primer


Friday, October 1, 2021

Painting updates and other items

Been a while since we've had a blog update, so here is the current status:

Fuselage painting:  We sprayed the 2nd and final coat of orange on the lower fuselage, then buffed out a few dust particles that always seem to find their way into the paint.  We wanted to remove all the masking on the fuselage, but decided to leave it on because we can't easily move the fuselage out of the paint room until we can put it back on the landing gear...which still needs to be painted.  So instead, we actually added some more masking to encapsulate the fuselage and moved it all the way to one side of the paint booth.  This will give us room to paint the landing gear in the booth while protecting the fuselage from any overspray.

Also, in the middle of September, we took a trip to Sebring, FL to attend 3 days of classes on Rotax engines.  We attended a 2 day class on engine maintenance and 1 day class on Rotax 912is installation.  The classes were excellent and we both learned some very useful tips from Rotax experts.

With the fuselage safely moved to one side of the booth, we prepped the Grove landing gear by removing some surface corrosion, cleaning it thoroughly, and hanging it up in the paint booth.  We also prepped the landing gear attach brackets.

Since we are priming aluminum, we changed to a different primer designed for use on metal.  We are using Superflite SF80 primer with SF820 catalyst.  We attempted to spray the primer, but ran into problems right away as spots started appearing on the parts, which could have indicated some sort of contamination either in the primer or on the aluminum.  We IMMEDIATELY stopped spraying (a lesson well learned from our issues fuselage painting).  We then immediately cleaned all the sprayed paint off of the landing gear with acetone.  This went quickly and only took a few minutes.  

So now we needed to figure out what went wrong.   Next go around, we are going to clean the aluminum with a product called "alumiprep" which should do a better job of cleaning in case there was still some contamination on the aluminum.  But it now looks like the problem was more likely caused by the primer/catalyst.  The product we had was purchased a little over 3 years ago, and we thought it would be OK, but we found that after mixing primer with catalyst (in the right proportions), it would never cure, even after sitting out for over 24 hours.  Not sure if the problem was with the primer or the catalyst, so we are ordering a fresh set of both and will try again once we get the new batch which should arrive in about a week.  Hours: 10


Landing gear prepped and hung for paint


Monday, September 6, 2021

Fuselage Orange, first coat

After cleaning the fuselage with alcohol, wetting the floor, and prepping with a tack-cloth, we sprayed the first coat of orange on the fuselage.  Looking pretty good so far, although as usual there was still some residual dust that got in the paint. Hours: 2.0

Ed & Mike suiting up and mixing the paint

Coat #1 of orange has been sprayed

Sunday, September 5, 2021

Prepping for Fuselage Orange

After creating the poster board pattern for our fuselage paint detail, we transferred that to some low tack stencil vinyl and placed that on the fuselage.  The edge was kept 1/4 inch short to account for the final finishing tape that will be applied later.  Then the straight tape was placed, again being kept 1/4 inch from the final paint line.    At the door opening, we had to make sure paint line would remain horizontal, so care had to be taken when placing this tape.

We completed both sides of the initial tape.  We then placed masking plastic on the top portion of the fuselage to protect it from the orange paint. This also wrapped around the vertical stabilizer.

We finally placed high quality vinyl finishing paint tape on fuselage making sure to keep straight lines straight and curved lines having smooth gentle continuous bends.

Ed marking the placement of final paint tape

The area to be painted was scuffed using a gray Scotchbrite pad.  This included primed and painted areas.  This step makes sure the new paint has something to bite into and adhere correctly.  Hours: 8 

Fuselage is ready for Orange Paint


Sunday, August 22, 2021

Paint Masking Stencils

Brought the tracing previously created into the house to make some measurements.  After making measurements, the curves were very nicely done and the points where the curves change directions were exactly placed.  WOW!  Can't ask for more!

The tracing was transferred to poster board.  Two poster board stencil templates were made, each being the mirror image of the other for each side of the fuselage.  Two more poster board stencil templates were made this time  with 1/2" more paper removed to allow for the masking tape removal and paint flow-out.

Tracing removed from Airplane and cleaned up
Templates made for masking placement.


Hours: 1

Monday, August 16, 2021

Cessna Vestal White Painting

 With the practice piece under our belt, we finally tackled the Cessna Vestal White color on the fuselage.  We had some areas that needed masking and then we painted a coat of the white paint.  Whew!  No Craters!  After the first coat dried we wet sanded with 600grit and applied a second and final coat.  We found a few dust particles in the paint so we decided to sand out the defects and then polish the paint back up to a glossy finish.  The polishing step took a lot of time.  We had areas on all three painted sides that needed attention.

Polishing Almost Done and playing with Paint Scheme

To remove the dust nibs we first wet sanded around the area with 600 grit sandpaper, followed by 1000 grit, then 2000 grit and finally 3000 grit sandpaper.  Then we got our our electric dual action polishers and went through four grits of polish to finally arrive at a nice glossy finish.

A few primer runs were found on the bottom of the fuselage where we will be painting the Ocala Orange color.  These were wet sanded out with 400 grit sandpaper.

We also started experimenting with paint layout.  We previously published a mock-up in X-plane of our paint scheme.  Due to the complexities of the original design, we decided to experiment with a simpler, but equally elegant side fuselage design.  Ed and I came up with a design that we're happy with and I again mocked up the scheme in X-Plane.

New Paint Scheme

Tracing paper was placed on top of the new design and traced. We will take this tracing and tweak the curves for a better shape.

Tracing Paint Scheme

Time: 20 hours


Sunday, July 25, 2021

Primer touchup and Painting a practice piece

Work on the plane had slowed a bit the past week or two because I was studying and practicing for my private pilot checkride (Michael is already a pilot, but I was not).  All the hard work paid off and I got my pilot's certificate this past week, so I was elated.

On the airplane, we applied a few coats of primer to the new patch tapes we applied.  We followed this by shooting a light primer coat over the whole fuselage.  We did this because the primer was thinned in some areas due to all the sanding that was done to remove the layer of bad paint.  After priming we then did a light (wet) sanding of this last primer coat to prep it for paint.

Since we had problems with paint craters the last time we painted, we decided to play it safe and paint a practice piece first.  We grabbed a fabric framed piece that we previously used for practicing fabric/paint work, sanded it, cleaned it up, and hung it up in the paint booth.  This time around we
made sure we mixed everything correctly, used our best filters for the paint, ensured the compressed air filter had fresh desiccant installed, drained residual water from the air compressor, cleaned the part thoroughly and wiped with tack cloth before spraying, and sprayed a tack coat before the final coat.  Everything went perfect and the coat of paint came out without any craters or blemishes.  Now we just hope we have the same experience when we paint the fuselage.   Hours: 7.5

Note to anyone who subscribes to this blog:  Google is removing "feedburner" services from blogger.com, and this is what sends automated notices whenever the blog is updated.  Google is not providing an alternative service to do this, so beginning sometime in August, automatic emails will no longer be sent when this blog is updated. Sorry about this, but I guess that feature wasn't generating enough revenue for Google and they no longer wanted to support it. 

Painting a practice piece to see if issue was resolved

Thursday, July 15, 2021

Recovering from paint issues

It took us a total of 3 weeks to complete the sanding to remove all the divots on the top coat.  This was quite an ordeal, and one we don't want to repeat.  We had 2 areas where we accidentally sanded through areas of finishing tapes, so before continuing, we patched those areas.  One was on the right side by the tail, and the other was along the center spine between the turtledeck and the tail.  We also noted a few spots along the top where we sanded through the primer and fabric was exposed, so added a few additional tapes to protect that area.  It's an area where fabric could come into contact with a supporting tube beneath it when it flexes, so we figured it was a good idea to add tapes here anyway.  The tapes should blend in well with existing tape lines so shouldn't stand out once painted.

small tape patch on right side

Additional spine tape, and protective cross tape

Once we finished these, we sprayed primer over the patch areas, plus a few other areas where the primer was very thin and green tapes were exposed.  A light sanding was done after this dried.  We will spray a second light coat of primer over everything to make sure we have decent protection.  We want everything sealed and protected, but don't want to add any more primer than necessary as this just adds weight.   Hours: 20

Saturday, June 26, 2021

Fuselage paint issues

 We masked off the bottom of the plane, and shot a coat of the "Vestal White" top coat.  Unfortunately, after spraying the entire fuselage, we found thousand of divots had formed in this coat.  There are several things that may have contributed, and I'm not going to go into the details, but the end result is that we are going to have to sand down the coat of paint we just applied (down to primer) to get rid of the divots and then reshoot the paint.  We'll be making some adjustments and will definitely paint a practice piece to make sure we have this under control before painting the fuselage again. 

We encountered this issue last week, and after a week of sanding, we are not yet 1/2 done, so this is going to take some time to recover from.  Not fun, but we are stubborn and want the plane to look nice, so we'll keep on sanding until it's ready to paint again.  Hours: 15

A closeup of some divots that appears after shooting the topcoat.


Sunday, June 13, 2021

Final Primer Coat

After we completed the wet sanding of the first coat of paint we wiped down the whole fuselage with Isopropyl Alcohol to remove any oils.  A final coat of primer was sprayed and allowed to dry.

Final Coat of Primer Applied

The fuselage was wet sanded with 600grit sandpaper removing any dust nibs and "fuzzies" around pinked tapes.  Extreme care was taken in this step as you don't want to sand through this UV protective layer and expose any fabric.

We've also been finalizing our fuselage paint scheme.  In our original design, there were a few areas where implementation was going to be difficult, so we made a few minor changes that should hopefully help out.


Hours: 7 hours

Sunday, May 30, 2021

Masking and Priming Fuselage

 We finished masking the entire fuselage, and shot a coat of white primer (2 cross-coats).  Since the temps were in the low 80s, we switched to warm-weather reducer when thinning the primer.  This slows the curing process a little bit to prevent the primer from drying too quickly.  We started on the bottom of the fuselage which was a good thing because we noticed a few runs on this less visible area.  After this, we quickened the pace a bit to prevent runs when shooting the top and sides of the fuselage.

Fuselage with a coat of white primer

After priming, we wet-sanded the base primer coat, which allowed us to smooth it out and also get out the runs that were on the bottom surface.  After sanding, we cleaned all the sanded surfaces with clean water to remove all the sanding debris.  Hours: 11


Monday, May 17, 2021

Fuselage Masking

Continuing on with masking the fuselage.  Definitely tricky in a few areas.  For example, we want to get a layer of paint on both the inside and outside of the door frame tubing.. which means we couldn't just close off the entire cockpit interior, so we are selectively masking so that we can spray all those tricky areas, too.  But we are continuing to make good progress.  Hours: 2.5

Ed masking around a door frame


Saturday, May 15, 2021

Fuselage prep for paint

 We cleaned the fuselage fabric with isopropyl alcohol, and then used acetone to clean up excessive glue spots from many of the fuselage tapes.  We also found several residual wrinkles and bubbles in the tapes that we fixed with a hot iron set at about 250 degrees.  Next we started masking the fuselage, which is actually a bit complicated because of all the tubing that gets in the way.  Still have a lot more masking to do, but making good progress. Hours: 10

Masking underway

Masking a window and baggage door

Tuesday, May 4, 2021

Engine arrives

 We took a brief hiatus from priming/painting for a few weeks due to vacation and other priorities, but one thing that we did do was order the engine from Lockwood Aviation.  The engine we are going with is the Rotax 912is, which puts out 100HP and is fuel injected.  We also ordered a few accessories after some consultation with Just Aircraft, such as the radiator, the larger oil cooler, the ring mount, and stainless exhaust.  Most parts were in stock, except for a few installation bolts and the ring mount.  

We received the engine crate less than a week after they received payment, which was impressive.  There was one minor hiccup (which Lockwood thankfully informed us about shortly after it was shipped), as the crate was missing the fuel pump assembly, and the oil tank had metric threads.  They shipped out the fuel pumps and the oil pump with standard threads right away, and we returned the other oil tank (they covered shipping).  Hours: 2.0

Opening up the crate

Spiffy new 912is

Tuesday, April 20, 2021

Fuselage paint prep

With the fuselage back in the garage, we started the prep work for paint.  We first removed the plastic wrap that was protecting the fuselage while it was in storage, put the fuselage on the rotisserie, removed the wheels, and then proceeded to remove the landing gear.   

This last item actually wasn't a trivial task as we needed lift the fuselage up a bit higher, then rotate it about 45 degrees to feed the gear legs through the fabric pass-thru, but the paint booth ceiling wasn't quite high enough to allow for this.  But we were able to take care of this by removing one 2x4 from the ceiling and bumping up the plastic a few inches.  This, along with the flexibility of the sheet plastic ceiling allowed us to rotate the fuselage enough to get the gear off.  

We did an initial clean-up of the fabric with isopropyl alcohol.  We noticed a few areas where there is some glue build-up, so we will go back and clean those up with acetone before masking for paint.

Hours: 6

Tires & landing gear removed

Wide-angle shot of the fuselage on the rotisserie

Sunday, April 11, 2021

Wing and Fuselage Transport

 Another big day.  We carefully loaded up our newly painted wings onto a trailer, secured them in place with some straps, and transported them to the airport.  This gets them out of way so that we can start painting the fuselage.  Once at the hangar, we set them in a wing-sling and then covered them with some plastic for a little added protection. 

Wings loaded onto the trailer

Removing some residual masking tape

Wings secured in place with straps

 Ed & Mike in the hangar with the wings

Next we loaded up the fuselage for transport back to the home workshop/paint-booth. 

Loading the fuselage onto the trailer

Fuselage on its way to the paint room

We tucked the fuselage into the paint booth, and it does fit nicely.  We will actually be taking it off the gear again and putting it back on the rotisserie before painting.  Hours: 8

Fuselage back in paint room