 |
| Adhesive (greenish color) brushed on for top fabric piece |

Friday, August 23, 2019
Left Wing, prep for more fabric
We did a little bit more work with the irons to remove some bubbles we discovered after gluing down the doilies to the left wing. Then we started adding new coats of adhesive, this time for installation of the top fabric piece. We applied a few coats of the glue to the leading edge, the fuel tank, the top surface of the ribs, and part of the trailing edge. Hours: 3.0

Sunday, August 18, 2019
Left Wing Fabric, bottom surface
We installed fabric rivets on the bottom of the left wing. These rivets are really just a backup to ensure that the fabric can never pull away from the wing. The rivet lines were covered with protective tape. Some finishing fabric tapes will eventually cover all these lines of rivets.
Next, we trimmed and glued the fabric at both ends of the wings. Then we performed the final fabric shrink on the bottom surface, shrinking the fabric at 300 and 350 degrees with irons.
Next, we decided to go ahead and install access port rings and doilies on the bottom surface. We measured and cut out the doilies from some pre-shrunk lightweight fabric, and also determined where we needed to install the plastic access rings. We applied glue, installed the access rings, and glued down all the doilies. Hours: 5.5
Next, we trimmed and glued the fabric at both ends of the wings. Then we performed the final fabric shrink on the bottom surface, shrinking the fabric at 300 and 350 degrees with irons.
Next, we decided to go ahead and install access port rings and doilies on the bottom surface. We measured and cut out the doilies from some pre-shrunk lightweight fabric, and also determined where we needed to install the plastic access rings. We applied glue, installed the access rings, and glued down all the doilies. Hours: 5.5
 |
| Left wing with rivets, access port rings, and doilies installed |
 |
| Closeup of doilies for an access port ring and the pitot tube |
Monday, August 12, 2019
Left Wing Covering Started
We laid the fabric over the wing, and started gluing the bottom sheet in place, starting from the trailing edge, then the ribs, then the leading edge. We had to carefully trim around the strut attach brackets. The fabric was shrunk at the lowest setting (250 degrees), and then we finished gluing the rest of the leading edge. A soldering iron was used to burn the holes for fabric rivets and nut plates. We will install the fabric rivets before shrinking the fabric at the higher settings. Hours: 6
 |
| Bottom fabric on left wing, with partial shrink |
 |
| Leading edge., before the scrap hanging down was trimmed off |
 |
| Fabric rivet holes and drain hole opened up with soldering iron |
 |
| Top view of wing shows how the fabric wraps around the leading edge |
Sunday, August 4, 2019
Right Wing Covering Completed
We finished covering the right wing this weekend after gluing down the last protective fabric tape, which was a wider 6" tape that will protect the leading edge of the right wing. This was a nice accomplishment, but now we get to do it all over again on the left wing.
The left wing was stored up in the shed rafters, so we hoisted that one down so we can start the fabric covering, and then hoisted the (now covered) right wing back up into the rafters for storage. Thunderstorms were building up as we were moving these wings around, but we got lucky and the rain didn't start pouring until we had everything safely stored away. Hours: 3.0
 |
| Fabric covering completed on the right wing |
The left wing was stored up in the shed rafters, so we hoisted that one down so we can start the fabric covering, and then hoisted the (now covered) right wing back up into the rafters for storage. Thunderstorms were building up as we were moving these wings around, but we got lucky and the rain didn't start pouring until we had everything safely stored away. Hours: 3.0
Thursday, August 1, 2019
Trailing Edge Tapes Done
We added the two trailing edge finishing tapes to the right wing. The top edge was done first followed be the bottom edge. On the bottom edge we had to cut small notches where the aileron and flap brackets were located. Once complete we used a soldering iron to burn the weap holes and screw attach holes. The holes around the aileron and flap pulleys were cut to their final size. Hours: 2
Tuesday, July 30, 2019
Trailing Edge Adhesive
We applied adhesive to the top rear edge of the wing for the finishing tapes to be applied later. Hours: 0.5
 |
| Bottom side of right wing |
Sunday, July 21, 2019
Right Wing Tapes
We installed all chord-wise protective tapes over the ribs on the top surface of the right wing, and also installed the tapes at both ends of the wing. At the wing ends, we wrapped the tapes around the edge a bit and glued them in place. We also installed two horizontal tapes on the top surface, and applied glue to part of the trailing edge for tapes that will be applied there.
As always, we worked through a few minor problems. A few tape wrinkles went unnoticed at first, but were discovered when we were about to apply a crossing tape. The wrinkles were fixed by spraying the area with acetone, peeling back the tape a bit to get the wrinkles out, applying more glue, putting the tape back down, and then smoothing it all out with an iron. Hours 6.0
As always, we worked through a few minor problems. A few tape wrinkles went unnoticed at first, but were discovered when we were about to apply a crossing tape. The wrinkles were fixed by spraying the area with acetone, peeling back the tape a bit to get the wrinkles out, applying more glue, putting the tape back down, and then smoothing it all out with an iron. Hours 6.0
Sunday, July 14, 2019
Wing Fabric Work
This weekend we got a lot of work done on wing fabric. We located and glued the plastic strengthening rings down to the bottom wing surface. a few of these will be opened immediately to help in the final constructions. And the remaining ones will only be cut open if needed after the airplane is flying. We also added fabric over the four wing strut attachment areas. Two main attachments and two for the jury struts.
Next we added the rib tapes on the top wing surface. Like the other tapes, this involved adding three coats of adhesive on the area, then applying the fabric and finally brushing a thinned mixture of adhesive on top and through the tape securing them in place.
Finally, we marked out the remaining areas on the wing that will need to have tapes added. Hours: 5
Next we added the rib tapes on the top wing surface. Like the other tapes, this involved adding three coats of adhesive on the area, then applying the fabric and finally brushing a thinned mixture of adhesive on top and through the tape securing them in place.
Finally, we marked out the remaining areas on the wing that will need to have tapes added. Hours: 5
 |
| Ed applying adhesive to Inspection Ring |
 |
| Ed admiring our work on the bottom wing surface |
 |
| Fabric tapes on the top wing surface |
Monday, July 8, 2019
Fabric Work
Fabric reinforcement needed to be added to the top fabric plate where the aileron cable exits and around the fuel filler port. "Doilies" were cut from pre-shrunk fabric. Three coats of adhesive were added to the areas around the attach points. Once the adhesive dried, the fabric cutouts were added and attached with thinned adhesive.
The wing was flipped over and the same thing needs to be done for the bottom aileron and flap cable exits fabric plates. Also, around the strut attach brackets needed fabric reinforcement. The fabric was cut and the area needing adhesive was marked in pencil. Hours: 1.5
The wing was flipped over and the same thing needs to be done for the bottom aileron and flap cable exits fabric plates. Also, around the strut attach brackets needed fabric reinforcement. The fabric was cut and the area needing adhesive was marked in pencil. Hours: 1.5
 |
| Fabric "Doilies" on the bottom of the wing |
Sunday, June 30, 2019
Right wing, top fabric
It's finally starting to look like a real wing, as the top fabric sheet has now been installed on the right wing. For this process, we first glued it to the perimeter of the wing and used irons to remove wrinkles. We then shrank the large fabric surface at the lower setting (250 degrees), which helped pull it tight across the leading edge, tank, and ribs. We again used small irons to remove wrinkles around the tank and the leading edge. Next, we glued any remaining fabric contact areas that were not yet attached (portions of ribs, leading edge, and trailing edge). At the ends of the wing, we cut the fabric with pinking shears, leaving enough to wrap around the edge of the wing. Then we glued these edges down after applying 3 layers of glue to the edge.
After the edges were glued down, we cleaned out the fabric rivet holes with a drill, then applied some reinforcement tape across the holes, and used a rivet gun to install all the rivets along the ribs. Lastly, we finished shrinking the top fabric surface in two stages at 300 & 350 degrees. Hours: 5
After the edges were glued down, we cleaned out the fabric rivet holes with a drill, then applied some reinforcement tape across the holes, and used a rivet gun to install all the rivets along the ribs. Lastly, we finished shrinking the top fabric surface in two stages at 300 & 350 degrees. Hours: 5
 |
| Top fabric surface installed |
 |
| Fabric wrapping around end of wing |
Wednesday, June 26, 2019
Top wing Surface
After completing the bottom wing surface we marked where we wanted access plate rings to be installed. We'll install the rings once the top surface is done and we start working on fabric plates and tapes. We added three good coats of adhesive to the top of the wing on all the ribs, the top of the fuel tank and the aluminum leading edge. We cut fabric to a rough size of the wing surface and starting at the leading edge we applied adhesive around the perimeter of the wing. We had a few wrinkles to get out with a low 250F iron. Hours: 2.5
Sunday, June 16, 2019
Wing fabric
We finished installing the bottom fabric sheet on the right wing. We shrunk it at just 250 degrees first, then installed the fabric rivets on the ribs, and finally shrunk the fabric at the higher settings (300 and 350 degrees). We also trimmed and glued the fabric at both ends. Hours: 3
 |
| Fabric |
Monday, June 10, 2019
Rt wing fabric
We finished gluing the perimeter of the fabric to the bottom of the right wing. We ended up with quite a few bubbles and bulges along the glued edge, but we were able to resolve these with judicious use of the irons. Hours: 2
Sunday, June 9, 2019
Wings, Adhesive and Fabric
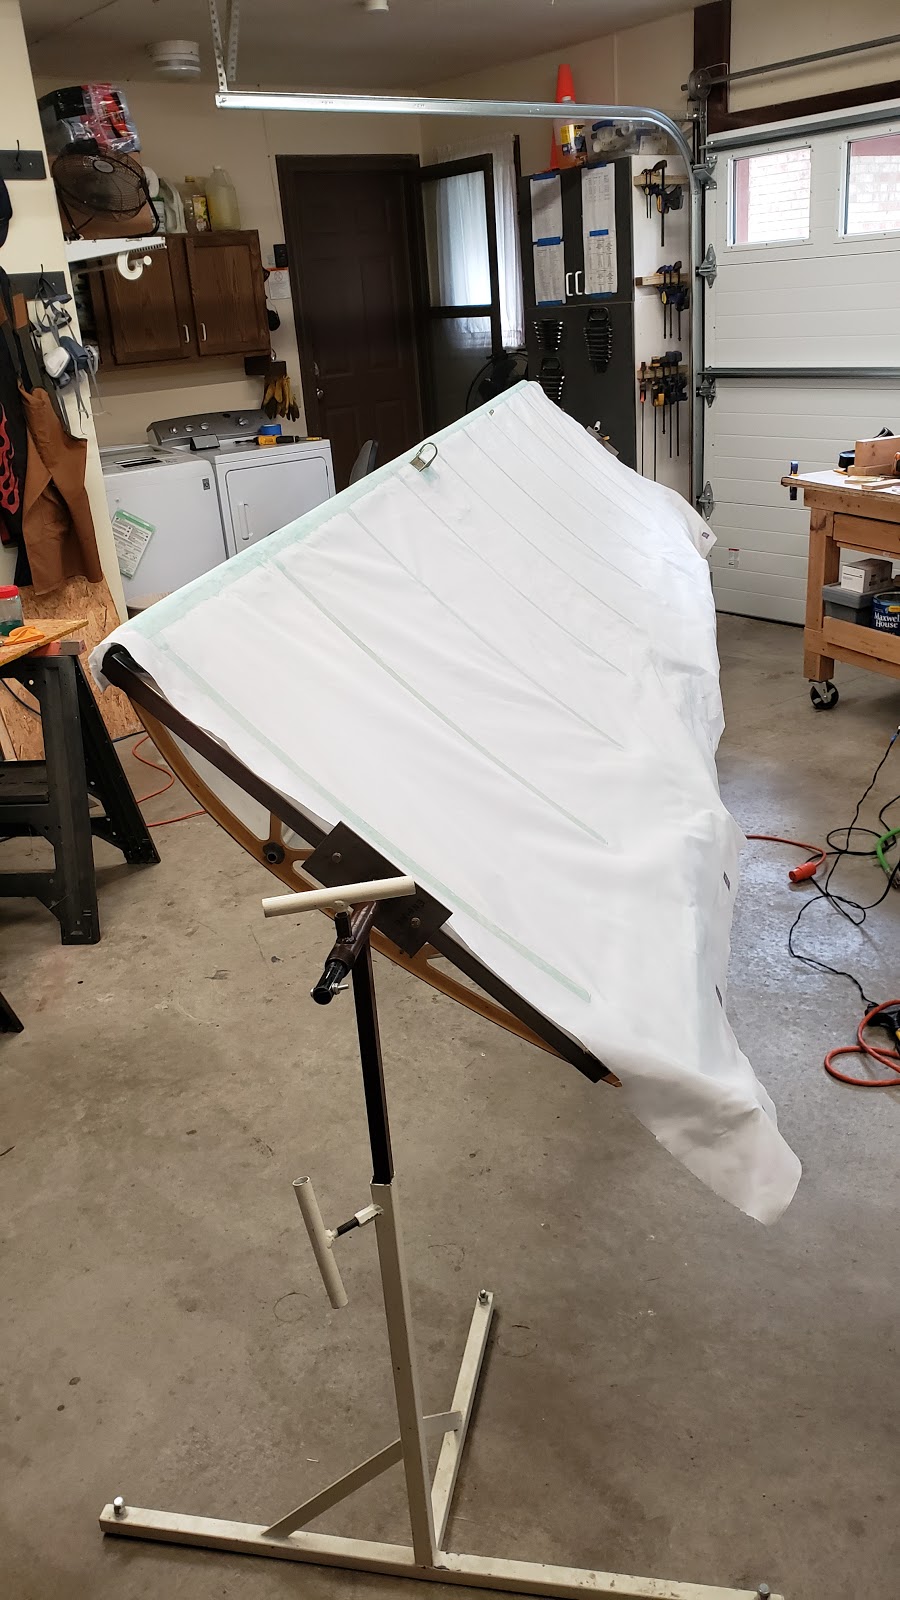
We started the task of attaching fabric to the bottom of the wings. First we had to determine what surfaces needed adhesive. We then applied three coats of glue to those surfaces. Boy did it take a lot longer to add the glue to these areas. We were used to "small" parts, but now that we've moved to the wings it surprised us how long it took to add the adhesive.
Once the adhesive was dry it was time to attach the fabric. In order to get a good straight line on the leading edge glue line, we snapped a chalk line on one edge of the fabric and then cut to that line. We started attaching the fabric to the leading edge, working from the middle outward. Once we were happy with that attachment, we added the thinned adhesive to the rest of the leading edge, wrapping around to the bottom surface of the wing. We used irons at 250F to get any bubbles/wrinkles out of the glued fabric. We had to cut holes for the strut attach bracket and jury struck bracket. We also had to do some custom cutting around the leading edge cuff. Finally we started working our way down the rib caps. Hours: 5
Once the adhesive was dry it was time to attach the fabric. In order to get a good straight line on the leading edge glue line, we snapped a chalk line on one edge of the fabric and then cut to that line. We started attaching the fabric to the leading edge, working from the middle outward. Once we were happy with that attachment, we added the thinned adhesive to the rest of the leading edge, wrapping around to the bottom surface of the wing. We used irons at 250F to get any bubbles/wrinkles out of the glued fabric. We had to cut holes for the strut attach bracket and jury struck bracket. We also had to do some custom cutting around the leading edge cuff. Finally we started working our way down the rib caps. Hours: 5
 |
| Added three coats of adhesive to the wing |
 |
| Fabric glued to the leading edge |
 |
| Fabric Glued to the bottom of the ribs |
Sunday, June 2, 2019
Wing Rotisserie
We finally started working on the Wing covering. We have the wings temporarily stored in our shed, mounted up in the rafters. We brought one of the wings into the garage and started making plans for mounting the wing in our rotisserie stands. We went to our local Home Depot Aviation Supply headquarters and bought some metal tubing to make the wing mounts. While Mike did the cutting of the tubes, Ed did the TIG welding. We used 1" square metal tubing. Once the welding was done we drill holes to match the rotisserie and mounted with AN3 bolts. We also bought foam pipe insulation and placed it on ends that go into the wing spars. We mounted the wings into the rotisserie so that we can begin the covering. The wings were wiped down with Acetone and Isopropyl Alcohol Hours: 5
 |
| One end of the Welded Rotisserie Wing Mount |
 |
| Wings mounted in Rotisserie |
 |
| Ed wiping the wings down with IPA |
Subscribe to:
Posts (Atom)